
Sawpiercing with saw blades.

We had an enquiry recently about jewellery saw blades, in particular 4/0 grade. We use saw blades nearly every day at PIKE – the invention and use of a saw blade and a frame has allowed jewellers to expand their design opportunities as well as increase their speed and a resolve a variety of detailed effects that would not be possible without them.
The grade number relates to how small the teeth on the saw blade are.

The grades range from an 8/0 sawblade, which has the finest grade of teeth, down to 0 and then up to grade 6 which has the largest teeth.
The saw blade is approximately 130mm long and is held in a saw frame, which is similar to a small coping saw – Matthew is using his in the photo above. Even though the saw blades are made of premium quality hardened and tempered steel, they are relatively brittle due to their fineness and break frequently – jewellers have to use just the right amount of pressure to avoid them breaking and despite this, we often break up to 7 a day!. They are held in the frame by being clamped at either end under tension and are mounted allowing for the adjustment of the blade length which keeps the blade taut. The fineness of the saw blades means they are used on softer metals in sheet form, especially precious metals used in fine jewellery making.
The saw blade performs a piercing action, driving downwards through the metal which is normally resting on a flat V-board or “birdsmouth’ board.

The board has a ‘V’ shaped cutout in one end and is clamped to a bench at the other end so that a section with the V-cutout hangs over the edge of the bench. This allows the work to be laid flat and either the work or the saw frame may be rotated. The V-cutout allows the saw blade to pass through the work unimpeded.
To begin the work, the intended design is transferred to the surface of the metal either by applying the design free form with a scriber or by gluing a paper sheet bearing the design onto the surface. A hole or a series of holes following the pattern is then drilled through the metal using a hand drill containing a small drill bit. The end of the saw blade , which has been released from the clamp holding the end of the blade, is introduced through the hole. The saw blade is then re-clamped under tension, and the saw is ready to start cutting out the design.
The design side of the work is normally upwards so the design can be seen and the cut line remains visible. The position of the saw must be vertical so the angle of cutting is accurate preventing distortion of the finished design. Once the saw piercing is complete, neatening is completed using needle files. The more accurate the first cuts, the better and crisper the finished design.
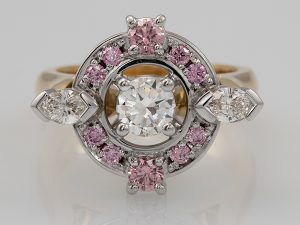
We have used the saw piercing technique for some beautiful pieces at PIKE. It’s the only way we can create the stunning and intricate side designs of our ‘halo’-style rings,


and when we make any designs that involve cutting out shapes.


Recent Posts
This blog post was written in collaboration with Nicholas and the clients. The commission began with Pike Jewellers being recommended…
Hello to you all. This month we are celebrating many things – the commencement of our sixth year at Highgate,…
The beginning of another collection for PIKE The weather may be dreary and cold but I find it an energizing…
We have always loved tourmaline at PIKE because of the amazing variety of colours they offer. Here are some of…
I am constantly impressed by the beauty of sapphires. Long gone are my days of thinking of sapphire as just ‘blue’; after working…